Sunday, January 5, 2014

Chicken Hawk


 What are you doing in here with my chickens?

I was just...laying down after a snack.


 Did you eat one of my chickens?

 Who...me?


You look like a guilty chickenhawk.

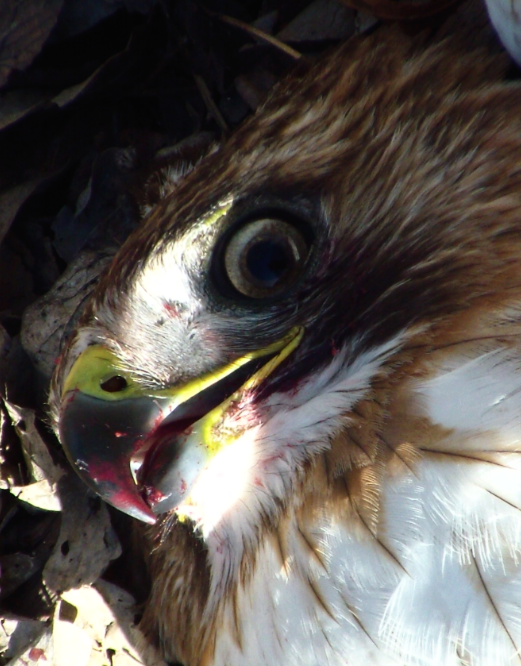
Red Tailed Hawk Actually...
and I don't even like chicken.


There are feathers stuck on your feet. I think you ate a chicken.

Oh those...well...uh...


Why is this chicken missing it's head? 
How did it get a hole in it?... It looks like you ate it. 

.............


And is that dried blood on your face. Sure you didn't eat my chicken?

...uh...well...Maybe I ate just a little...


.....................................

FINE I ate it OK! 
It's cold out and I was hungry!


You know what I do to things that eat my chickens!?

.......You know I am a legally protected right!? 
 
........I'll let you off this time. I didn't want that one anyway. It was a rooster.

...I thought it was a little tough.


Since you ate my chicken can I get a picture with you before you go?

I hate pictures.


CHEESE!


...Didn't you eat another one of my chickens a while ago? 


...I think i hear my chicks calling...Later.


Video:


Friday, October 4, 2013

New Bee Stand

Our bees have been fending off the invasion of the "Crazy Ant" in our area for some time now. The ants were so numerous and relentless that I decided to give the bees a break. Through some inspiration I came up with the design for bee stand to keep out ants. This design is based on the fact that ants are poor swimmers. I say poor because some ants bunch together and cross water if you can call that swimming. So this design is not full proof but very effective. Basically this is done by surrounding the four legs of the stand with water.

I started with cutting up some very thick sections of pipe for the legs. Next I welded on some sections of angle iron to mount the wood beams. These mounts were sprayed with paint to keep them from rusting. I also added some mounts at the top in case I want to add some shade next summer.

To surround the legs with water I needed some way to attach a container to them and seal it to hold water. This is accomplished by adding a larger section of pipe in the same hole as the legs. By pushing these larger sections of pipe into the same concrete that hold up the bee stand you have just created a moat around each leg. This is the most simple way to create a water tight moat around each leg.

Up Close View of Moats
The wood beams were next. I used 2"X10"X12' so it could hold up as many fully loaded be hives as possible. These were temporarily attached while I set the concrete to help hold up the legs. After the concrete set up I attached the beams with carriage bolts. I added a 2"X4" on the top inside of the beams to make the surface wider where the bee hives will sit.

Moving the hives was the difficult part. First we put a ratcheting strap around each hive to keep them together. After I sealed the front entrance we moved the hives to their new location. We did this work at night when all the bees were home in the hives. This is important because in order to move the hive the 10 feet from their original position I needed to trap them inside for 24 hours. When they are released the bees must be forced to reorient themselves or reset their homing device. This is accomplished by putting some branches with leaves over the entrance before opening it. If this is not done the bees will try to return to their original position.

New Bee Stand with Moats


Sunday, January 6, 2013

Roll Away Nest Boxes


To accommodate all of the new layers in our flock we updated our nest boxes. We wanted to be able to collect the eggs without having to wait for the chicken to leave the nest. To keep the eggs cleaner we wanted the egg to roll away as soon as the chicken stood up, which also reduces broken eggs. The last requirement was to be able to easily clean the nest box.
With all of these requirements and some ingenuity along with spare parts around the house we came up these beauties. The best part of these nest boxes are their simplicity. There are really only 5 parts. So far they work great and they save us from getting our hands pecked when we collect eggs.

 Below is a parts list:
-         - 6 Gallon Bucket
-          -Fake grass
-          -3” square rubber
-          -Wood board
-          -Wire

Instructions:
Cut 2/3 of the bottom of the bucket rounding the corners.  This is the side the chicken will sit in This cal also be removed for easy cleaning.  Next cut a hole out of the bucket lid but don’t cut near any of the edges and leave one side flat. Attach the hinge to the flat side of the flap, I used rubber and wire. Drill small holes and poke the sharp wire thru the hole while holding the rubber in place. Bend the wire over. Repeat for the lid and the flap.  You can also use this wire to create stops for the flap so it will only open inwards and so it not hang open.  Cut wood board in a round shape to fit into the bucket about 1/3 of the way into the large end.  Cut a flat side tall enough for the egg to roll by with the grass in place. Screw the board in place. Take the small scrap of wood and screw it to the end of the bucket where the chicken will enter. This makes it easier for the chicken to grab on as she jumps in. Cut piece of fake grass so it is the length of the inside of the bucket and fits under the wood wall. No need to glue this down as the ends of the bucket and the wall will hold it in place. This will also allow the fake grass to be removed for cleaning. Screw nest box in place making sure the angle allows the egg to roll just fast enough on the fake grass.
I did nine nest boxes at the same time so I cut round holes in a 4’ x 8’ sheet. I took the pieces I cut out and used them for the wall to separate the chickens from the eggs.


 Parts Needed

 
 Insert Chicken Here

 Steal Eggs Here

 
 Chickens Like

Saturday, December 15, 2012

My Star Roosters


I currently have 8 roosters. That is about 3 too many.  I need to weigh them to see which I want to keep.
There is one Rhode Island Red, 2 Partridge Plymouth Rocks and 5 White Plymouth Rocks.  The Partridge Rocks are the best looking. The Rhode Island Red is at the top of the pecking order as far as I can tell. I can barely tell the white ones apart. There is one that took longer to develop than the others. At first I thought that was not a good thing. Then I read about the Jersey Giant chicken. They are a meat bird that take a long time to develop. The benefit is that the roosters meat does not get tough as fast as other breeds do. If I can get a strain of White Plymouth Rocks that is slow to develop, they would make a really nice meat birds. 

 Partridge Plymouth Rock
 Rhode Island Red
 White Plymouth Rock

Saturday, December 1, 2012

Lots and Lots of Fresh Eggs


Our Egg output has increase substantially. Our record so far is 26 in one day. The rate decreases with lower temperatures in winter and with the higher temperatures in summer.  We are getting a nice spectrum of colors as well. We sell eggs to those we go to church with and I also sell them at work.  I have often been asked what makes fresh home raised chicken eggs different from store bought eggs.  I reply that it is the same difference between a garden fresh tomato compared to a store bought tomato. There is really no comparison. The store bought tomato is the idea of a tomato. It looks like a tomato but it does not taste like a tomato nor does it smell like one. This is the same principle with a fresh egg that you get from your own chickens. Each one is different depending on what that chicken ate during the time that egg was developing. My chickens have the opportunity to forage for bugs, eat plants and dig for worms.  Store bought eggs on the other hand are from chickens that spend their whole life in a small cage eating only chicken feed. No sunlight, no bugs, no worms. All of those natural things that make an egg taste like an egg are absent. So all you are left with is man’s manipulated egg. Mass produced, lacking taste and character.


Sunday, September 30, 2012

Here a chick, there a chick, everywhere a chick chick...

Because we recently decided to expand our chicken collection to increase our egg output we needed a larger chicken run and chicken house. With some hired help I was able to get the run and chicken house done in about a month of evenings and weekends. That included 400 feet of wire fence, netting and electric fence. A new gate finished the run. The chicken run encloses about a quarter of an acre.

 
Our front yard afforded a nice place for the chicken house. The ground underneath the coop was very rocky which never grew anything anyway but provides a nice place to catch the nice manure for the garden. It is 10 feet wide by 8 feet deep and can comfortably fit 60 chickens. We used a recycled window and recycled  metal roofing for the siding. It features a wire floor, one large window, a full size door, 3 large ventilation flaps and a light on a timer. It sits right under two trees that provide shade in the summer but not in the winter.  All together the chickens now have more living space than we do! 

More nesting boxes still need to be added before all the new hens start laying. When all the hens get up to speed we will be getting about 2-3 dozen eggs a day!

Wednesday, July 4, 2012

The itsy bitsy spider

Once while working under the vehicle I was laying on the driveway. All of the sudden I noticed something moving toward me on the driveway. I turned my head just in time to see this little guy heading for me.  It is an understatement when say I got out from under the vehicle in a hurry. He was not intent on eating me but was just passing by.

We have a few of these little guys walking around when we walk our dog. They are never very large and don't seem worried about us.